Groups for policies and training
Groups collect recurring audiences, such as Human Resources, Development or Management. Assign the group to a policy or training course; its current members receive the assignment.
This feature is available from version 1.24.0, currently in beta. Managing groups requires an administrator account. Policy assignments require write permission; participant groups require permission to manage the training course.
Create a local group
- Open Settings > User Management > Groups.
- Click Create group and enter a Name. These examples use Personalabteilung, German for Human Resources.
- Choose Local under Source.
- For policy and training assignments, leave Role set to No role rule.
- Use Search members to find people and tick their checkboxes. You can search for different names in turn; selected members remain selected.
- Click Save. The group appears on the left with its member count.
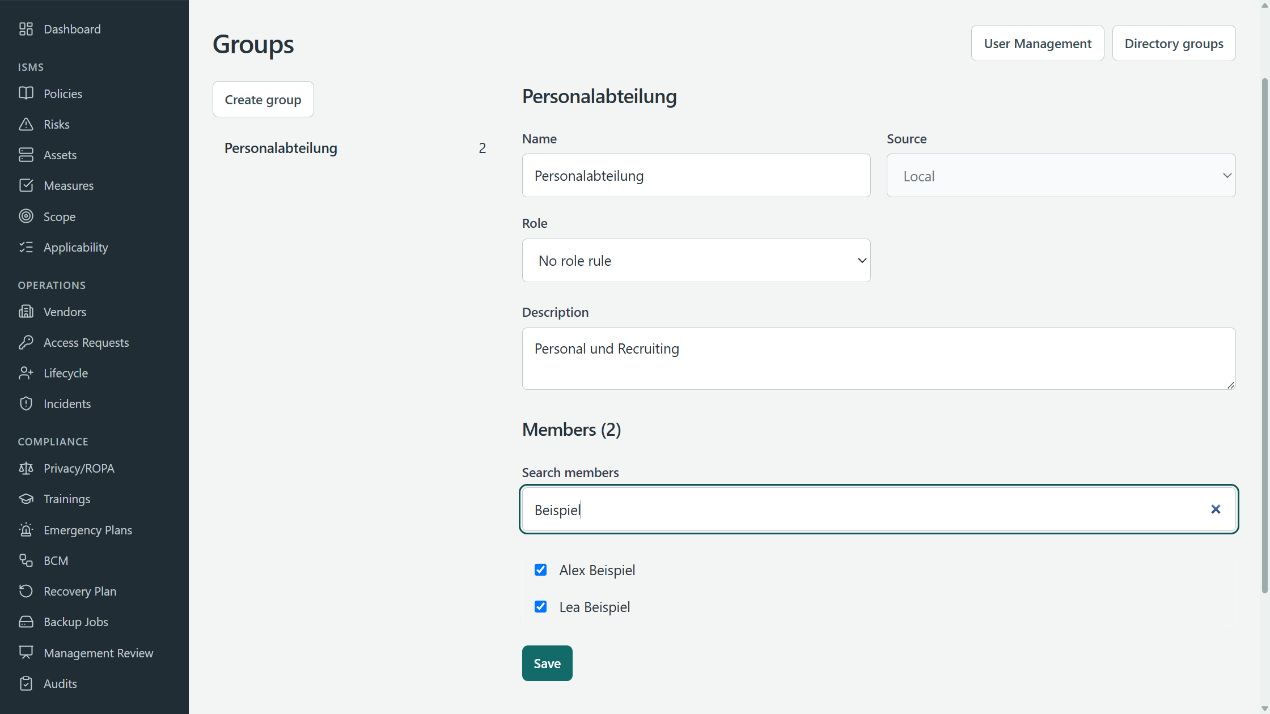
A person can belong to several groups. To change membership, select the group on the left, add or remove members and save again.
A role rule optionally manages a user's ISMS role. To use it, select a role and priority, save, then explicitly select users under Role management and apply the rule. The lowest priority number wins when several groups match. This is not required for the policy and training assignments shown here.
Select a group from AD or Microsoft Entra
Configure the connection under Settings > Authentication first. Employees must already exist as users with their directory identities linked. Selecting a group does not create new user accounts.
- Open Directory groups from user management. Select the source or create one with Add source.
- Click Create preview. Review the run and apply it using Apply roles to make the group catalogue available. For policy and training assignments alone, leave additional users for role management unselected.
- Open Groups > Create group. Enter a name and select the directory group under Source.
- Under Members, choose Direct or Include nested groups, then save. The source and membership mode are fixed after creation.
- Follow Preview and apply directory synchronization and apply a new preview for this source. The linked members and Last sync then appear in the group.
With the schedule enabled, later directory membership changes are synchronized. Maintain these members in AD or Entra; a directory group's local member list is read-only.
Assign a policy to a group
A policy has two separate audiences:
| Setting | Effect |
|---|---|
| Visible to | Who may read the policy. |
| Acknowledgment | Who must personally acknowledge the approved policy. These people must also be allowed to see it. |
You can combine several roles and groups in each section. One matching role or group membership is enough within each selection. The usual module permissions still apply. Users with policy write permission can still view and manage policies independently of the reader audience.
Example: HR acknowledges, IT can read
- Open Policies and create a policy, or open an existing policy using Edit.
- Set Acknowledgment to Roles and groups.
- In the new Acknowledgment > Groups section, tick Personalabteilung. Leave the roles unselected for this example.
- Under Visible to, clear All to deselect the previously selected roles. Select the IT role and, under Groups, Personalabteilung.
- Save the policy. For a previously approved policy, also enter a Change summary.
- Complete review and approval of the new version. Leave Require re-acknowledgment enabled at approval if the audience should acknowledge this version.
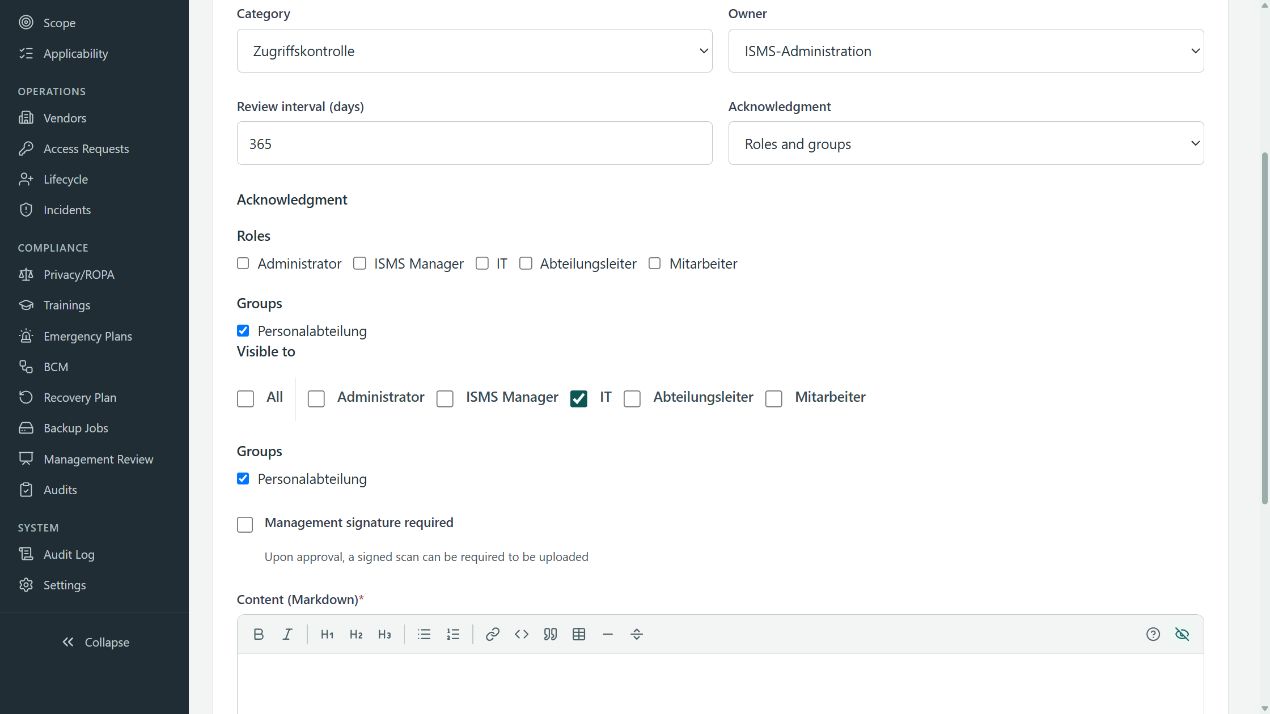
In this example, members of Personalabteilung and users with the IT role can read the policy. Members of Personalabteilung must acknowledge it. To require IT users to acknowledge it too, also tick IT under Acknowledgment > Roles. For a group-only reader audience, leave all roles unselected under Visible to.
Each person acknowledges individually. Use the policy's Acknowledgments tab to check completed and outstanding acknowledgments.
Assign training to a group
- Open Trainings and select the course. Create and save a new course first if needed.
- On its detail page, find Participant groups.
- Select Personalabteilung in the Group field and click Assign.
- Repeat for any additional groups.
- Open the Participants tab. Active group members appear with their individual participation status.
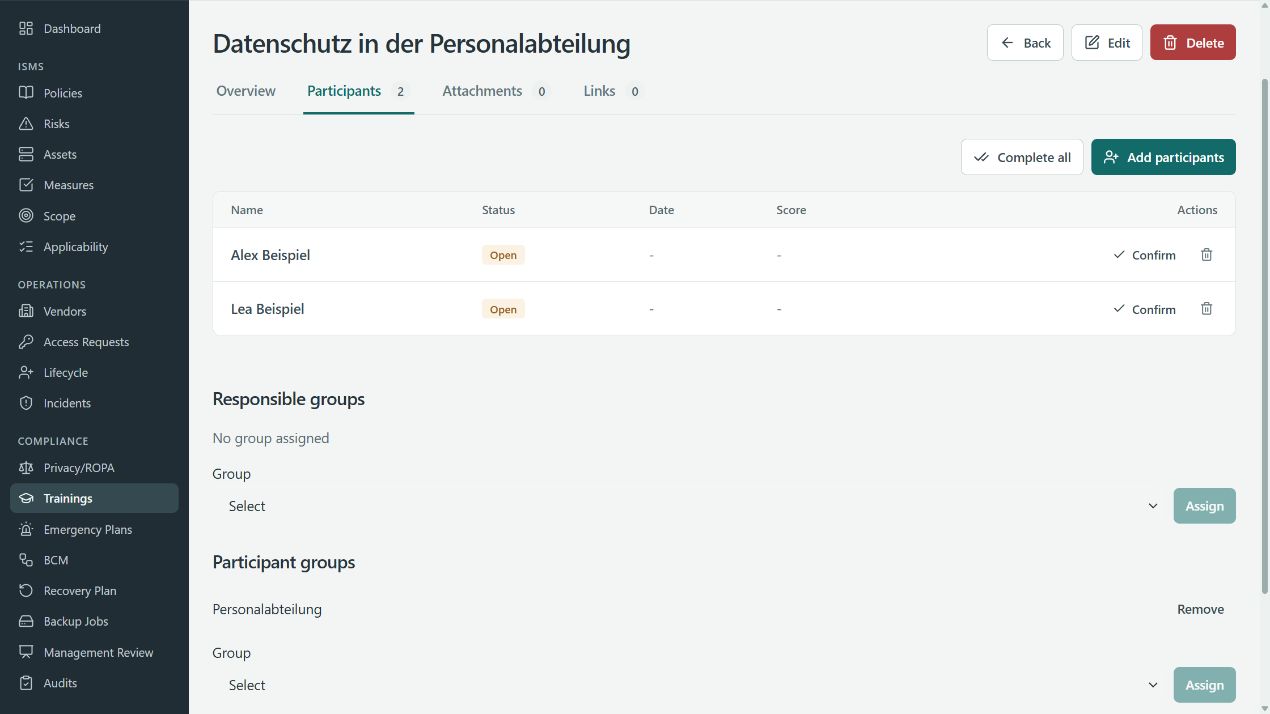
You can still assign individuals using Add participants. A person assigned through several groups or additionally assigned directly appears only once.
Responsible groups records which group owns the work. This assignment does not create a training obligation or grant additional permissions.
What happens when membership changes
Assignments remain linked to the group:
- Joining: New active members receive assigned training and outstanding acknowledgment obligations for approved policies. Policy visibility settings still apply.
- Leaving: An open training assignment originating only from this group ends. Policy access and acknowledgment obligations end if no other selected role or group still matches.
- Other assignments: A direct training assignment or membership in another assigned group remains effective.
- Evidence: Existing policy acknowledgments and completed training remain documented.
Local membership changes take effect when saved. AD and Entra use the applied directory snapshot; updating the related assignments can take a short time after synchronization.
Remove an assignment
For training, click Remove next to the group under Participant groups. For policies, clear the relevant checkboxes in the editor and save. Visible to and Acknowledgment are changed separately: removing an acknowledgment obligation does not automatically remove read access.
Existing evidence remains. Before deleting a group, remove its policy, training and responsibility assignments.
Back to the manual · Users and training · Policies and evidence